How to Convert Low-Quality Images into 16K Ultra High Quality Using AI
Do you have blurry, pixelated photos that you wish could look professional and sharp? Thanks to modern AI image enhancers, you can now upgrade any low-quality photo into ultra-high resolution (even up to 16K) within minutes. In this guide, I’ll show you the exact step-by-step process to improve your photo quality using an AI tool called Kai AI.
Why Use AI for Image Enhancement?
Traditional editing software like Photoshop requires skill and time to enhance photo quality. On the other hand, AI-based image upscalers use smart algorithms to add missing details, sharpen textures, and fix pixelation automatically. The result is a much cleaner and sharper image without much manual effort.
Step 1: Open Chrome Browser
The first thing you need is a browser. Since almost every mobile and desktop has Google Chrome, we’ll use that. Open Chrome on your phone or computer.
Step 2: Search for Kai AI
In the search bar, type Kai AI and open the official website. You’ll see the AI interface appear right at the top of the search results.
Step 3: Disable Desktop Mode on Mobile
If you’re browsing from your mobile, make sure to disable “Desktop Site.” This ensures the interface works smoothly and avoids unnecessary complications.
Step 4: Upload Your Image
Once inside Kai AI, look for the Upload button. Select the photo you want to enhance from your gallery and upload it. Within seconds, your image will appear in the AI workspace.
Step 5: Select the Right Enhancement Model
You’ll find multiple AI models to choose from. For the best results, always pick the Carrier Legacy model. Other models may distort colors or textures, but Carrier Legacy works best for sharp details and realistic enhancements.
Step 6: Adjust Quality Settings
- Set resolution to 4K or higher.
- Increase Clarity for sharper textures.
- Enable Match Colors to keep natural tones intact.
After applying these settings, click the Enhance button. The AI will start processing your photo.
Step 7: Fix Loading Issues with VPN
Sometimes, the process may get stuck at 0%. This usually happens if the server is overloaded. A simple fix is to use a VPN app from the Play Store. Connect to a different server (outside India or your local region) and reload Kai AI. Once connected, try uploading and enhancing again — it will work smoothly.
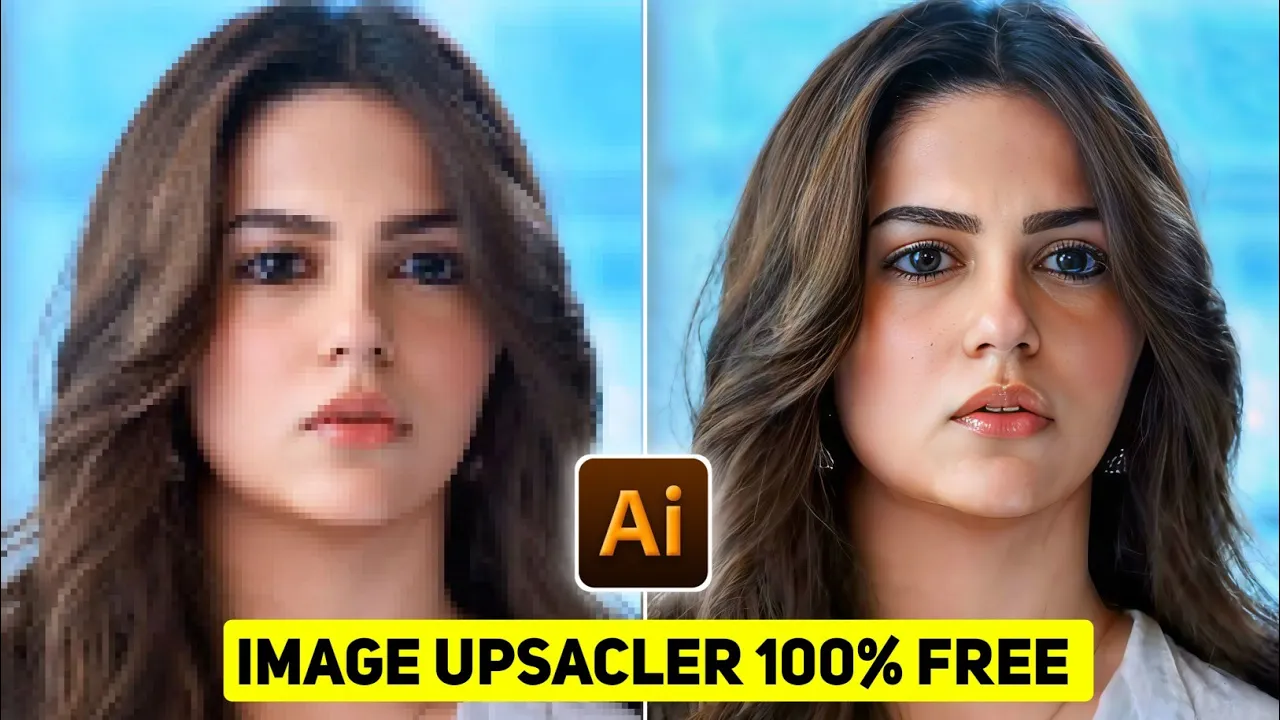
Step 8: Compare Before and After Results
After enhancement, download your photo. Compare the before and after images — you’ll notice:
- No more pixelation or blurry details.
- Sharper facial features like eyes, lips, and hair.
- Improved textures and depth in the photo.
- File size increases (sometimes up to 17MB), proving that the resolution is much higher.
Step 9: Enhance Multiple Times
If you want even sharper results, you can repeat the process. Upload the already-enhanced photo again and apply the same settings. Each round adds more clarity and details, giving you near-professional results.
Final Thoughts
Converting low-quality photos into 16K ultra-high resolution is no longer just for professionals. With tools like Kai AI and a simple VPN trick, anyone can achieve crisp, detailed, and visually stunning images right from their phone or computer. This method is 100% working and easy for beginners.
If you’re interested in exploring more tools, you can also check out Topaz Gigapixel AI and PhotoDiva as alternative image enhancers.
Try it today and transform your old, blurry memories into high-quality masterpieces!